I’d like to introduce “Machine Learning for Kids“: a tool to help school children learn about machine learning by making things with it.
The video above is a walkthrough of the tool and examples of how I’ve been using it. The rest of this post is a transcript for the video.
machinelearningforkids.co.uk is a simple tool for training a variety of types of machine learning model, and an environment for creating games and other interactive projects that use them.
This is done by extending Scratch: a visual programming environment created to teach coding to kids, that is widely used in schools and other educational organisations like Code Club and Girls Who Code.
It gives students a blank canvas without prescribing what they make. They’re free to use their imagination and creativity to find fun uses for the machine learning models that they train.

It’s easier to see the potential for the tool if I show you some projects kids have already made with it.
I’m going to run through a few projects, and in the interest of time, I’ll go through them pretty quickly.
But before I do, all of the examples that I’ll show are available as downloadable instructions from the “Worksheets” tab.
Each of these gives step by step instructions with screenshots so it’s easy to know how to build the project. The worksheets also calls out the lessons behind the project including introducing some of the terminology we use.

I’ll include a link to this Worksheets list in the description. If you want to know more about any of the projects that I’ll show, (and several more I won’t have time to show) that’s the place to go.
“Happy Face”
Let’s start with one of the simplest.
In this project, I’ve drawn a face. There are three Scratch “costumes”: a straight face, a happy smile, and a sad crying frown.
The aim is to get the face to react to messages that you type to it – smiling if you compliment it, and crying if you insult it.

Instead of trying to predict every possible message and put that in the code like I’ve got here, the kids train a machine learning model so that it’s able to recognise whether a new not-seen-before message is probably a compliment or an insult.
So I’m going to create a new project, and call it “happy face”. And tell it that I want to train a machine learning model to recognise text.
To train my model, I need to collect examples. Examples of compliments and examples of insults, so that the computer can use these to learn to recognise them.
I’ll create two buckets for my training data: a bucket for compliments (“kind” messages) and a bucket for insults (“mean” messages).
I need to write some examples of each. I’ll start by writing ten of each.

I’ve run this project with groups of kids several times, and it’s fascinating to watch how they seem to struggle to come up with more than a few compliments, but have no problem with coming up with dozens of insults!
It doesn’t take long to come up with enough to get started though. With a few minutes work, I’ve got my first ten examples of each.
So with them, I can go into the Learn and Test page. This page gives feedback on that training I’ve done so far, but I’m just going to go ahead and start training using the examples I’ve written.

The training takes a minute or two … but once it’s ready I can start testing the model. I can test the computer to see how good it is at recognising new messages by trying it out with new examples of compliments or insults – examples that I didn’t include in the training so that it is hasn’t seen before.
If it’s not very good, I can go back to the training page and add more examples.
But for now, I’m going to go back to my face character in Scratch.
As I said before, Scratch is a visual drag and drop tool for teaching coding. Programming constructs are represented as blocks that snap together and you arrange them on a canvas to make your program.
Machine Learning for Kids builds on that, by representing the machine learning model that I’ve just trained as another block, that will snap together with all of the coding constructs that the kids are already used to.
The machine learning model I’ve trained, and the labels for my two training data buckets, have all been added to the Scratch palette as new blocks.

This means it’s really easy for me to modify that script I had before to make it use the machine learning model I’ve created.
It’ll use the model to recognise the text, and if the model classifies it as kind the face should smile, otherwise the face cries.
By extending a coding environment that kids are already familiar with, it not only makes the tool easier for them to learn, I’m also sending an important message.
I’m telling them that machine learning isn’t about replacing coding. I’m not saying they don’t need to learn to code because of machine learning. It’s about adding machine learning to their tool box. It’s about extending and enhancing what they’re able to create with code using new additional tools.

This project is just a fun quick intro to sentiment analysis, as one use for machine learning.
Digital assistants
Let’s look at another project.
In this one, students create devices in a virtual room. Here I’ve got a fan and a lamp. In this project, we talk about digital assistants, and how digital assistants like Siri or Alexa can understand what you mean to be able to control smart devices in the home.

I’m going to train another machine learning model, again this time to recognise text.
This time I need four buckets of examples for my training data : for Fan on, and fan off. Lamp on and lamp off.
These are the four types of message that I want to train my smart assistant to be able to understand. The kids just need to write some examples of each of these.
Many of the kids I’ve seen do this project give more than just the obvious examples like “please turn on the fan” or “can you switch the fan on”. They’ll add examples like “I’m too hot” or “It’s hot in here”. Or they’ll add examples like “It’s too dark, I can’t see” as an example to train the model to turn on the lamp.

A key thing is that it’s not about the final result, but about the journey the kids get to go on. For example, I often see that the first model they train isn’t very good at recognising commands. Then they go back and they add more examples, and they see how the next model they train is improved as a result, how much better it is at recognising commands. This iterative process (and seeing the impact of additional training for themselves) is the sort of thing that helps them start to understand how this stuff works and how it behaves
I’ve written a dozen examples for each bucket, so that is enough for me to get started.
Again, I go back to the Learn & Test page for feedback on my training.
And more importantly, to be able to train a new machine learning model with just one click.
Once this has finished training, I can go back to my virtual devices in Scratch.
The palette of blocks in Scratch has automatically been updated with new blocks to represent the machine learning model I’ve just created, and new blocks to represent the labels (for each of the four buckets of training data I set up).
I can use these to easily make my digital assistant.

Just by dragging a few blocks and snapping them together on the canvas, they’re able to see the virtual devices respond to commands in natural language – in English. Using a machine learning model that they trained themselves, and that they got to see improve as they trained it.
With all of these projects, I get the kids to experiment and test.
For example, what if they ask something that isn’t anything to do with the lamp or the fan.
If I ask this “Make me a cheese sandwich” it’s disappointing to see the lamp turn off.
Going back to the Learn & Test page briefly, I can see that the machine learning model actually had a very low level of confidence that it recognised that command from the training I’d given it.
This lets me introduce the idea of confidence scores, of thresholds. More generally, it lets me talk with the kids about why the system wasn’t able to recognise this message: because there was nothing like it in the training that it had been given.
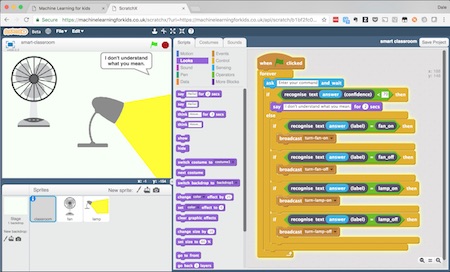
Learning about this lets them update their Scratch projects. For example, in this case, because the confidence score (that number for how confident the machine learning model was that it had correctly recognised the command) is also available as a block in Scratch, I can use this to update my script so that if the confidence isn’t high enough, the digital assistant can say it doesn’t understand.
“Sorting Hat”
Not all of the projects have to involve them writing the examples to train the system with themselves.
It’s often fun to get them to train models using text we can find, such as movie titles or song lyrics.
In this project, based on a fantastic project that Ryan Anderson did a couple of years ago, I get the kids to create a Harry Potter Sorting Hat in Scratch.

Training this one involves creating four buckets: one for each of the school houses in Harry Potter. I get them to look through Harry Potter books and find quotes from their favourite characters, to train a machine learning model to be able to classify text based on training it with the use of language from characters in each House.
They’re training a model to start to recognise patterns in the way that characters in different houses choose their words and structure their sentences.
And once they’ve done this, this will again show up in Scratch, and they can use this to create the Sorting Hat (although they tend to do a better job of drawing it than I’ve done here). That Sorting Hat can use a message from their friends to be able to say which school House they should go in.

Rock, Paper, Scissors
Not all the projects that I’ve been doing with the school groups have been using text.
Rock, paper, scissors is a good example of a project that uses pictures. In this, I get the kids to create the game “rock, paper, scissors” in Scratch, using a webcam to take a photo of their hand to let them have their move, and using machine learning to train the computer to be able to recognise what shape their hand is making.
For this, I needed to create three buckets for examples of pictures of the rock, paper, and scissors hand-shapes.
I used my computer webcam to take photos of my hand in a rock fist shape, photos of a paper flat hand shape, and photos of my hand in a scissors shape.

Once I’ve trained a model, I can go to Scratch, and again my new image classifier shows up as blocks in the Scratch palette.
The script to use it is super simple. And with a little script around it to add the rules of the game, I’ve quickly got the basics to create rock paper scissors in Scratch.
I’ve run this activity with schools groups a load of times, and what it nearly always ends up highlighting is the importance of variety in the training data. There is almost always at least one kid who tries to rush collecting the training data, who just goes for quantity and takes dozens of almost identical pictures of each hand shape. And their model tends to be very very poor at recognising the hand shapes in the game.
But you get them to try again, this time taking a variety of photos with their hands in different positions and from different angles, and the improvement that has on how good their model is at recognising photos is huge.
As I said before, the final result isn’t as important as the journey they go through, and the lessons they learn about this technology as a result.

To test the game, I need another photo of my hand, so I use the webcam to take a live photo of my hand.
Then I write a script to let the computer make it’s choice, and be able to tell which of us has won based on it’s ability to recognise what shape my hand was making. An ability that it has because I trained it to be able to do that.
For kids to be able to see for themselves how this works and how it can be done has a bigger impact than I think you’d get from just telling them about the tech.
“Top Trumps”
I’ve also run some projects using machine learning models trained on numbers.
One of the most popular is based on the card game “Top Trumps”. They can create a version of the game in Scratch (this one is based on Kings and Queens of England). This is the game where you have a card and have to choose one of the attributes on the card, and compare that number on your card against the other player’s card to see who wins. Maybe you pick which King or Queen was the one with the most children, or the one who reigned for the most years.

In this project, they create a machine learning model that they train to play the game.
They train a machine learning model so that given the values on the computer’s card, it can predict which attribute would give them the highest chance of winning against you.
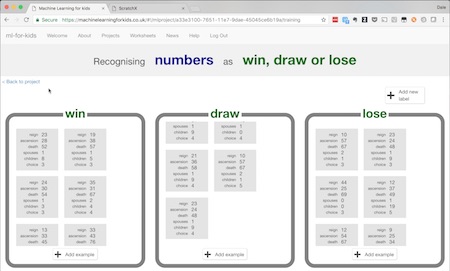
I’ll create a project to learn to recognise numbers, and give it a list of the numbers that are on each of my cards.
I need three buckets in the training data – for examples of hands that I win, examples of hands that I draw, and examples of hands that I lose.
I start by getting them to train the machine learning model manually. Typing in the numbers that were on their card when they played the game, and which of the values they chose. And they put that example in the right bucket depending on whether they ended up winning, drawing or losing.
And then they do that again for another card.
Manually collecting the training data, in the supervised learning approach I’ve shown before. It’s very quickly obvious that this is a slow, painful process.
The blocks that get automatically added into the Scratch palette from their machine learning projects includes blocks for collecting training data, as well as using the models.
This is a great way to be able to talk about different ways that real-world machine learning projects collect training data, and it helps introduce ideas like reinforcement learning.
For Top Trumps, it makes an easy way to quickly collect a lot of training data.
With only a tiny change to their script, they can make their Scratch game collect training data as they play.
After every hand of the game, their script sends the values from the card, which value was chosen, and the outcome (whether it was a win, lose or draw). It sends all of that back to the machine learning tool, where the values are added to the buckets of training data automatically.

It means they’re creating training data as they play the game.
The more they play, the more examples they’re collecting to train the computer with, and so the better the machine learning model gets at learning how to play the game.
Creating a game that learns as you play against it, even for a game and a model as simple as this, is a really powerful way to explain some interesting machine learning ideas to kids.
“Judge a book by it’s cover”
I’d love to go through loads more project examples, but this video is already too long so I’ll just show one last example.
This is another project based on pictures, and is based on the phrase “judging a book by it’s cover”.
The idea of the project is to get the kids to see if they can train a machine learning model to recognise what genre a book probably is, based on just what the cover looks like.
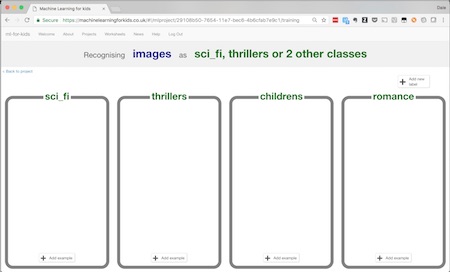
For this, I’ll choose a few genres: sci fi, political thrillers, childrens books, and romance.
The easiest way to get training data for this project is using the website of a library or book store that has pictures of book covers. From there, I can easily drag the examples I want into my training buckets.
I’ve been using the project worksheets as suggestions and as jumping off points. For example, with this, it doesn’t have to be book covers. You could use movie posters from IMDB and train a machine learning model to recognise the genre of a movie from it’s poster.
And it doesn’t have to be genres. You could do the year it came out, and train the computer to recognise the difference between movie posters from the 1960s vs movies from today.
Or to recognise different art styles or works from different artists.
The important thing is the tool lets the kids play, to be creative, to try out their own ideas. None of these projects are intended to be prescriptive.

Once I’ve trained a machine learning model using this training data, I can create a game in Scratch to be able to test this.
I’ve collected a “test set” of images: a set of pictures of book covers that I didn’t use to train the machine learning model. I can use this test set of pictures to see how good my machine learning model is at recognising book covers. I know that it’s a fairer test that way because I haven’t shown these to the machine learning computer before.
That idea of a test set is another important idea in machine learning that projects like this help to teach.
I’m using these test pictures to make a game in Scratch.
The game will go through my test set and display one book cover at a time. It asks both the machine learning model and a person to try to predict the genre based on the picture of the cover.

I’m making a game in Scratch to let a person compete against the computer to see whether the computer can be as good at learning to recognise a book by it’s cover as the person can.
The buttons on the left are for my friend to play the game and record their guess.
And the machine learning model’s prediction is displayed in the box on the right.

The script to be able to do all of this is really simple, and is again just snapping together a few blocks on the canvas, in this Scratch tool that all of the school groups that I’ve worked with have already been very familiar with.
Teacher’s page
Finally, I want to quickly touch on a few practicalities. This tool was created for use in the classroom, which brought with it a few unique requirements. Firstly, it’s web-based, so there’s nothing to install to be able to use it.
Children don’t need to have an email address to be able to use it. User management is all handled by their teacher (or for coding groups like a code club, by their group leader). The teacher or group leader can create and monitor user accounts for their students, and reset their passwords if needed.
The tool doesn’t need any personal information about the students who are using it. The teacher is free to create anonymous accounts for their students, with usernames like “student1” if they want.

As well as user management, the Teacher’s section of the tool also lets them monitor the resource limits that are set for their class, so they can keep track of what they’re using.
As I mentioned before, teachers are also able to download a variety of activity worksheets and template projects, each written to illustrate different uses and aspects of machine learning.

So, that is “Machine Learning for Kids”
A tool to help kids learn about machine learning, through first-hand experiences
A creative space for school children to make things using machine learning tech.
A tool that lets them train machine learning models for themselves, and provides them with a guided visual creative environment for building and making things with it.