I finished putting together my latest gadget this afternoon – a mini home server made from a Linksys NSLU-2 NAS device and a portable USB harddrive.
Why did I want it?
Do I really need an excuse? 🙂
Now I have a full, albeit small, Linux server at home, I’m sure I can think of some fun things to do with it. But as I wrote last week, the catalyst that pushed me to doing this now was wanting something to collect data from my new CurrentCost electricity meter.
It needed to be cheap, small, and low-powered – no point having a server running all the time to monitor my home’s electricity usage if it makes a significant dent in my electricity usage all by itself!
What did I buy?
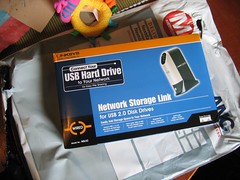
A NSLU-2 – a network storage link for USB 2.0 disk drives, by Linksys. This is a small NAS device that lets you make a USB harddrive available on a network. The firmware in it comes with enough software to create a network share for any portable USB harddrives or USB flash memory key that you plug in.
It’s a neat little gadget, but what makes it special is that it is very easy to flash the firmware and replace it with a full Linux distro. Plug in your USB harddrive, and you have a Linux server with as much space as you might want.
Oh – and for some reason, people call them “slugs”.
What did it cost?
 A Google Shopping search turned up pyramid.com. I bought the NSLU-2 from pyramid.com for £42.89, which included VAT and next-day delivery. I’d never heard of them before, but as first impressions go, their service seems pretty good.
For the hard-drive, I spent £11.57 (again, including VAT and delivery) on a cheap-and-cheerful 4GB USB microdrive from ebuyer.com.
In total, my new home server cost me £54.46.
Turning it into a Linux server
There is a fantastic community site around the NSLU-2 at nslu2-linux.org which contained all the info that I needed to get going. In fact, the whole thing took no time at all.
Here’s a quick overview of the steps involved.
 Unpack the NSLU-2 and plug in power and an ethernet connection.
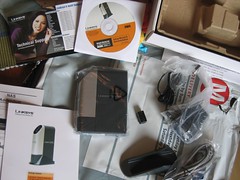
The box comes with a CD with a setup wizard and manuals – didn’t need any of that. The device comes with a web admin interface – didn’t need that either. 🙂
First step – choosing a Linux distribution. The NSLU2 site contains a ton of information on the different options available, but you can find a table with a good summary here. I decided to go with SlugOS/LE – it’s small – based on OpenEmbedded so there are a ton of packages already available for it, all optimised for embedded devices. Plus it comes with a recent kernel and recent version of glibc. It’s a Debian-like install – so installing new software is all straightforward – you can just use ipkg.
Once chosen, I downloaded the firmware binary image for SlugOS/LE on the NSLU-2 from slug-firmware.net.
Next you need something that will flash the firmware with the image – I downloaded the Sercomm Update Utility from one of the mirrors listed on the NSLU2 site, and installed it on my Windows laptop.
Before you can flash the NSLU-2, you need to put it in “Upgrade Mode”. This takes some fiddly mucking about with the reset button, but it’s well documented. Once in Upgrade mode, you run the Upgrade Utility. You point it at the Windows machine’s network card, and it finds the NSLU-2 itself. It showed the current version of the firmware – which was the same as the version that the Linksys web admin specified – so that was enough reassurance to get me to specify the firmware image I’d downloaded and click “Upgrade”.
A few minutes later, the NSLU-2 boots up. By default, it has an IP address of 192.168.1.77 – you can SSH to it using the default root password.
There is a utility called turnup to do the basic startup configuration. This is well-documented, but even without that, there is a default motd message displayed on login that walks you through the steps.
You use turnup init to set the basic network config parameters. Then you plug in your harddrive, and set up the partitions for your Linux installation.
I used fdisk to divide my 4GB drive into three partitions:
Disk /dev/sda: 4095 MB, 4095737856 bytes
128 heads, 63 sectors/track, 992 cylinders
Units = cylinders of 8064 * 512 = 4128768 bytes

   Device Boot    Start       End    Blocks   Id  System
/dev/sda1               1         600     2419168+  83  Linux
/dev/sda2             601         787      753984   82  Linux swap
/dev/sda3             788         992      826560   83  Linux
Most of the space went to partition 1 for my root filesystem, partition 2 for swap space, with the remainder for my home filesystem.
There are clear instructions online, but basically you create the filesystem, move the root filesystem from the NSLU-2’s flash memory to the USB harddrive, then set up the mounts.
And that’s it – a mini Linux server that’s ready to go.
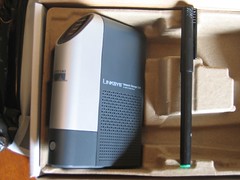 In fact, I’m still amazed at just how tiny it is.
Look at the pic of it next to a pen of mine – it’s not even as tall as my pen!
So far, I’ve only installed perl and python on top of the default distro, and I’ve still got a decent amount of space left:
root@minipooter:/$ df -h
Filesystem                Size      Used Available Use% Mounted on
/dev/sda1                 2.3G     80.5M      2.1G   4% /
/dev/mtdblock4            6.4M      4.8M      1.6M  75% /initrd
/dev/sda1                 2.3G     80.5M      2.1G   4% /dev/.static/dev
tmpfs                     2.0M     28.0k      2.0M   1% /dev
/dev/sda3               794.5M     16.0M    738.1M   2% /home
tmpfs                    14.8M         0     14.8M   0% /var/volatile
tmpfs                    14.8M         0     14.8M   0% /dev/shm
I’ve not done anything interesting with it yet – I need to buy a cable to connect it to the CurrentCost meter before I can start collecting data.
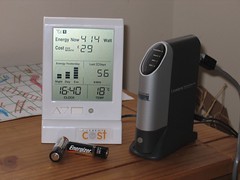 But in the meantime, the server has already taken it’s place next to the CurrentCost meter.
Awww… ain’t it cute? 🙂
Tags: currentcost, gadgets, home server, linux, nslu-2, nslu2, slug, slugos
[…] dale lane fan of all things mobile, father of small girls, IBM code monkey, youth charity trustee… « My new home server – a NSLU-2 […]
[…] about my CurrentCost meter that I’m using to monitor my home electricity usage, and the small home server that I’ve set up to collect the […]
[…] I’ve finally got my home server capturing the electric meter readings from the CurrentCost, I thought it’d be good to try […]
[…] No Comments ….what should I do (aside from upload currentcost data)?! Dale has an excellent post about the installation, and for me it was pretty much the same. The only real difference was that […]
[…] mentioned before, I’m publishing the CurrentCost readings to a small broker running on my home server. The plan was to write a Java application that uses MQTT to subscribe to updates from the […]
[…] My new home server – a NSLU-2 Toaster-style JBOD USB Rack New OLPC laptop to bring sexy touchscreens, gadget envy to the Third […]
[…] 1 – Connecting CurrentCost to Windows Like my Slug home server, my ThinkPad doesn’t have a COM port, so I’m using a USB to Serial adaptor cable. When […]
[…] to the meter constantly, collecting every update and maintain your own history (e.g. with a Slug or Viglen-MPC, storing every update from the meter in […]
[…] […]
Subject: home server – a NSLU-2
If my hardrive that I put into this enclosure unit has xp would it work? Using the Linux Distribution can you navigate the net straight from this home server? With the OS installed would it be able to detect other usb connected devices like a usb phone? I know that you can install an xp or other os by connecting an external drive on a PC. I also know that these type of devices connect to the router, so it must have a lan card. I am attempting to setup low power system that I can install (XP) hopefully so I can then use skype usb phone to make calls.
@Angelo – I doubt you could get it to work with Win XP. If you want a low-powered Windows server, my recommendation would be to go for a Viglen MPC.
There were offers last year to get this for under £80, but I don’t know how much one will cost now.
It is the cheapest option I am aware of for a low-powered Windows server.
Hope that helps, Dale
[…] I have to confess to being an absolute beginner with Linux. Fortunately I was able to copy a fellow CurrentCost owner’s idea of using a Network Storage Device to grab the data from the CurrentCost. Ben has done it too, not […]
[…] store digital photos, a server to run some personal code projects on that were getting too much for my Slug to handle, a media server for videos and mp3s, something to handle backups for the netbooks at […]
Dale
I have used a Viglen MPC-L micro PC for just this purpose. A little more expensive but at £110 inc delivery iut is very good value and works fine. Uses a version of Ubuntu and we have it pushing real time data out to a dashboard http://dashboard.meniscus.co.uk/home-energy.html
network server…
[…]My new home server – a NSLU-2 « dale lane[…]…